
Some customers ask: “The two-way mirror has already been installed, and everything worked fine during testing, but now it’s not working—people on the lit side can see through the mirror to the other side.” The mirror itself hasn’t changed, and the installation looks the same. What has changed is the lighting.
The lighting for two-way mirrors fails in predictable ways, and most problems boil down to the same cause: the difference in light levels between the bright side and the dark side is insufficient, or changes have occurred at certain times of day or under certain environmental conditions that the installer did not test for. The mirror itself is functioning exactly as it should; the problem lies with the lighting setup.
This article will explain why this light ratio fails, what these numbers mean in real-world rooms, how to measure whether your light difference is sufficient, and in which specific situations problems are most likely to occur.
What the ratio actually means
The “10:1 ratio” is widely regarded as the standard for two-way mirror illumination. However, the actual values cited in technical literature are somewhat lower. In TwoWayMirrors.com’s technical specifications— —which contains photometric data measured in accordance with ASTM and NFRC standards—the recommended ratio for a standard two-way mirror (68% reflectance, 11% transmittance) is set at 8:1 between the viewing side and the observed side. If this threshold is not met, the observer’s side will become visible when light passes through the mirror from the brighter side.
The commonly cited 10:1 ratio is a reasonable practical target for ensuring reliable performance under various conditions (such as changes in daylight, eye adaptation, and viewing angle). 8:1 is the minimum standard. The range between these two values serves as a margin of flexibility to accommodate variations in real-world applications.
This ratio specifically describes the illuminance on both sides of the mirror, measured in lux. An 8:1 ratio does not mean that the bright room must be eight times larger or require eight times as many lighting fixtures; it means that the illuminance level measured on the bright side of the mirror should be at least eight times that measured on the dark side.
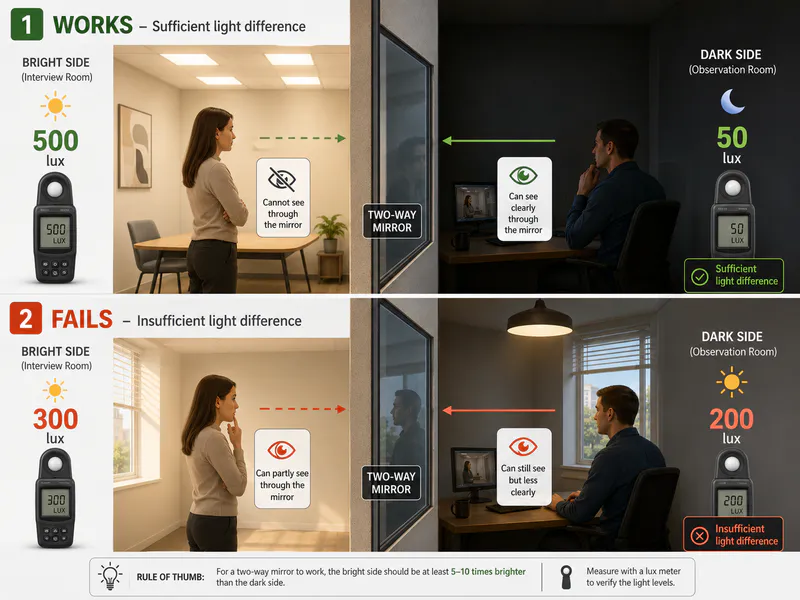
Why 8:1 at the mirror surface, not in the room
This point is often misunderstood by installers. Room brightness and mirror illuminance are not the same thing. A room may have very bright overhead lighting, but if the light is directed toward a desk or workbench rather than the mirror, the illuminance on the mirror’s surface may still be low. Conversely, even if a room appears dim, the illuminance on the mirror’s surface may be high if a light is shining directly onto it.
For both sides of a mirror to appear reflective, light must fall on the mirror surface from the brighter side. Ceiling lights directed toward the floor are not as effective at improving the reflectance ratio as directional fixtures placed close to the mirror.
The same principle applies to the dark side. A room with dark walls and no overhead lighting may appear almost pitch-black to the human eye, but a single lit screen, a monitor’s standby light, or an indicator light can all produce measurable illuminance on the mirror surface and diminish the effect—especially after the observer’s eyes have adapted to the darkness.
Measuring whether your ratio is sufficient
A lux meter—an inexpensive, handheld light meter that costs less than $30 and is widely available—is a practical tool for checking the light-to-dark ratio. Without taking a measurement, you can only guess.
Method:
- Place the lux meter’s sensor against the mirror on the bright side, pointing outward toward the room. Record the reading.
- Repeat the process on the dark side, turning on all ambient light sources that would be present during actual use.
- Divide the reading from the bright side by the reading from the dark side.
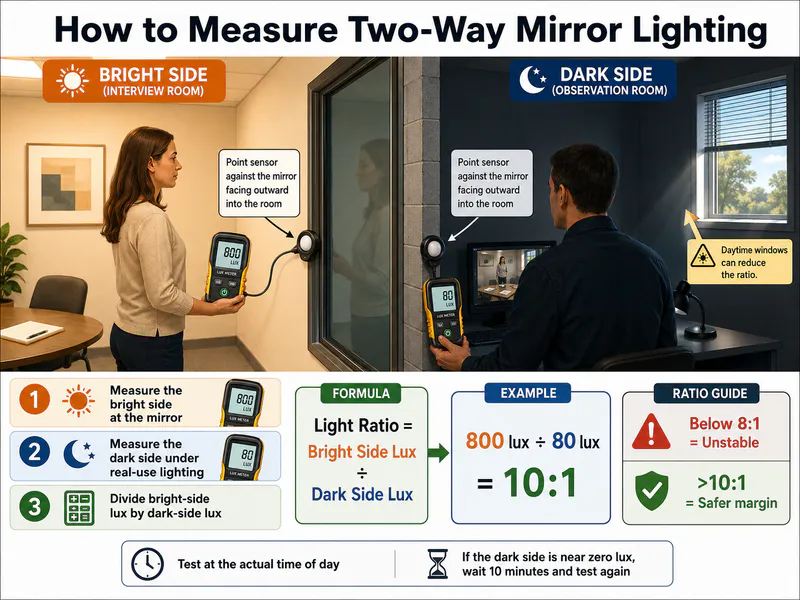
If the result is less than 8:1, the lighting will be unstable. If the result is greater than 10:1, there is a margin of safety for the installation. If the reading on the dark side is close to zero while the reading on the bright side is very high, close the door, wait ten minutes on the dark side, and then test again—visual adaptation (explained further below) can alter the actual experience, even if the measured values remain unchanged.
Conduct the test during the time of day when the installation will actually be used. A setup that measures 15:1 at night may drop below 8:1 during the day if there are windows on the dark side.
The four failure scenarios
Based on the relevant information we found, the following four scenarios are the most likely to result in “one-way mirror failure.”
The hallway observation room
This is the most challenging common scenario, and TwoWayMirrors addresses it directly in its Observation Room Buying Guide: they describe it as the requirement that many installers find most difficult to meet, using the specific example of a ward door and window where the observer is located in the hallway. Their practical assessment is that it is indeed difficult to maintain sufficient darkness in a busy hallway relative to a well-lit hospital room. Their recommendation in this situation is to add directional lighting near the mirror on the side of the person being observed, rather than attempting to dim the hallway—which may not be feasible at all if the hallway is a shared passageway.
Their additional recommendations for improving the contrast ratio without a dedicated darkroom include: adding light fixtures on the bright side near the mirror to increase illuminance at the mirror’s surface; and painting the wall on the observation side a deep, nearly matte gray (they suggest a shade close to gunmetal gray) to reduce the light reflected back toward the mirror from the observation side.
The smart mirror in a bright room
Smart mirrors installed in kitchens, bathrooms with windows, or any room with strong natural light face the same structural issues as those in hallways, but in the opposite direction: the “dark side” is the display and the room it’s in, while the “bright side” is the environment surrounding the mirror. In a sunroom during the day, the ambient illuminance at the mirror surface can easily exceed the brightness produced by the display, reversing the brightness difference and making the screen nearly invisible.
There are two viable solutions. The first is to increase the display’s brightness—a high-nit display positioned close to the back of the mirror will provide a higher illuminance contribution than a dimmer screen or one placed farther away. The second is to control ambient light at the mirror’s location: slightly recessing the mirror or installing a shallow light shield can reduce the angle at which ambient light strikes the surface without having to darken the entire room.
The specular illuminance from the screen decreases with the square of the distance. Halving the distance between the screen and the back of the mirror can approximately quadruple the luminous flux contribution—adjusting the screen’s position relative to the mirror is typically the most cost-effective solution before making any lighting modifications.
The correct ratio that stops working at dusk
An installation that functions properly during the day but fails at night (or vice versa) is almost always due to one side being exposed to fluctuating natural light. Windows on the shaded side provide a certain degree of support to the sunlit side during the day, but once daylight fades, the balance shifts.
The diagnostic method involves conducting tests at multiple times throughout the day. Once a time-dependent failure is confirmed, the solution is typically to block the natural light source on the dark side, rather than continuously increasing artificial lighting. Blackout curtains, sealed door gaps, or window coverings can all help establish a stable baseline that does not fluctuate over time.
Eye adaptation on the observer side
Even if the measurement ratio at the mirror surface is correct, the observer’s subjective experience may change after spending some time in a dark space. Human vision adapts to low light, increasing sensitivity over approximately 20–30 minutes; an observer who has spent half an hour in a dark room will be better able to see the bright side than when they first entered the room.
This does not alter the physical properties—the light transmittance is fixed—but it does change the actual experience. For installations intended primarily for sustained viewing, the dark side requires a greater margin than the minimum 8:1 ratio. A measured ratio of 12:1 or higher ensures a consistent visual effect even after the eyes have fully adapted.
Judge according to the situation
| What you see | Likely cause | Where to check |
|---|---|---|
| Observer side visible from bright side, all times | Ratio below 8:1 | Measure lux at mirror face both sides |
| Works at night, fails in daylight | Natural light on dark side | Windows, door gaps on observer side |
| Works initially, fails after 15–20 min | Observer eye adaptation | Increase ratio to 12:1 or more |
| Screen visible but dim (smart mirror) | Screen brightness or distance | Screen nits, screen-to-mirror distance |
| Patchy areas visible from bright side | Uneven bright-side illuminance | Directing lighting toward mirror face |
If the measured lux ratio is correct but the installation still isn’t working properly, it’s worth checking the mirror. Make sure the reflective side is facing the brighter side—as described in the Installation Guide and the Two-Way Mirror Guide, installing the mirror backwards is more common than you might expect. Also verify the reflectance/transmittance ratio of the sheet itself: in an 8:1 lighting setup, a 50/50 sheet will perform worse than a 70/30 sheet because more light from the bright side will pass through rather than be reflected back. As the sheet’s transmittance increases, so does the lighting ratio required to achieve the same effect.
For installations where sufficient contrast cannot be achieved through lighting adjustments alone, switching to a sheet with higher reflectivity—for example, replacing a 50/50 sheet with a 70/30 sheet—can reduce the lighting load. The trade-off is reduced screen visibility on the smart mirror, or a slightly more opaque field of view as seen from the observer’s side in the observation room. This is a genuine trade-off rather than a free solution, but in situations where lighting cannot be fully controlled, it tips the balance in favor of the mirror effect.