
We cut a lot of acrylic mirror in production, and we get asked regularly how to do it without cracking or chipping the sheet. The technical answer is that cracking and chipping come from three causes: mechanical stress concentrated in one spot, heat from friction at the cutting edge, and inadequate support under the sheet during the cut. Melted or rough edges are almost always a feed-rate problem. Once you know which of these is causing the trouble, the method that avoids it is straightforward.
This guide covers how to cut acrylic mirror cleanly — which method to use for your sheet thickness, the blade and speed settings that matter, and how to handle holes, curves, and edge finishing. The same principles apply whether you call it acrylic mirror, mirror acrylic, or mirrored acrylic; it is the same PMMA material with a reflective coating, and it processes the same way.
Keep the protective film on
Leave the masking film on both faces of the sheet for the entire cutting process. We ship every sheet with this film for a reason: it protects the mirror surface from scratches during handling and cutting, and it gives you a surface to mark the cut line on without marking the mirror. Mark the line on the film, cut through film and all, and remove it only after the piece is cut, finished, and ready to install.
For saw and jigsaw cuts, a strip of masking tape over the cut line, on top of the film, further reduces edge chipping. It is not necessary for clean scored cuts, but it helps on powered cuts where the blade entry tends to chip the surface. In PlasticRanger’s cutting tutorial, they also recommend keeping the protective film on both sides, which allows the mirror surface to remain scratch‑free throughout the process.
Choose the cutting method by thickness
There is no single correct way to cut acrylic mirror. The right method depends on sheet thickness first and cut shape second.
For thin sheets with a thickness of about 3 mm or less, we use CNC for cutting or engraving during production, which works better for acrylic materials. However, acrylic is not suitable for stamping; stamping is more suitable for PC materials, especially when the thickness is below 1 mm.
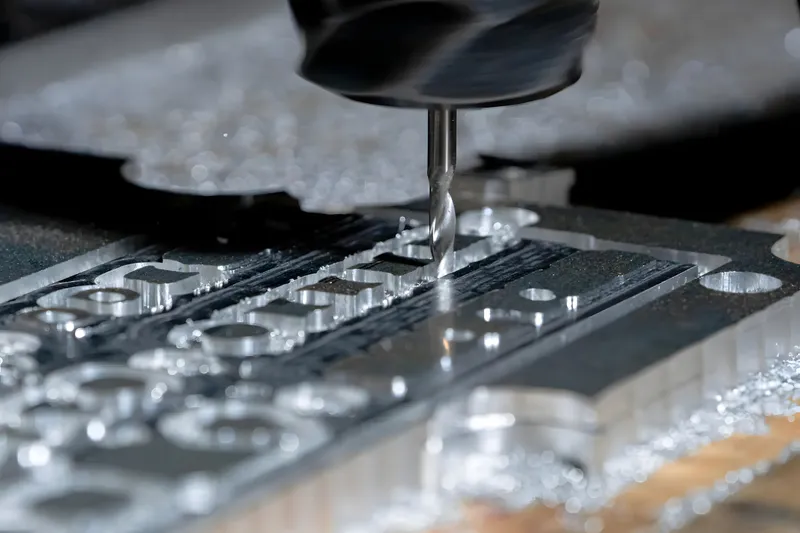
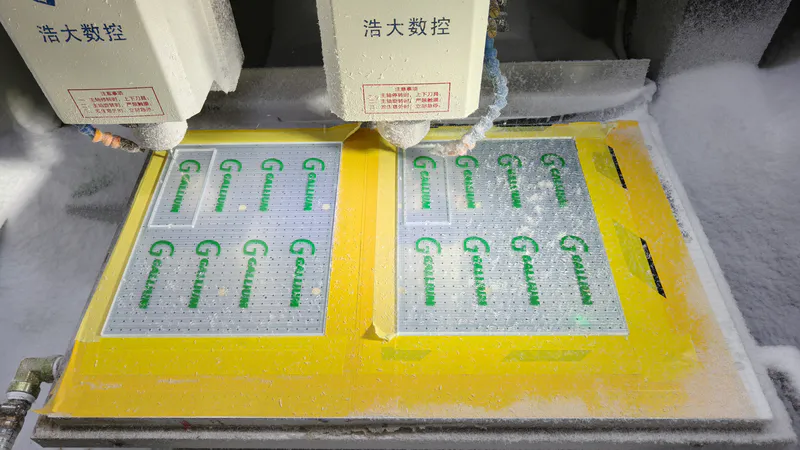
For curves, circles, and irregular shapes, score and snap cannot be used at all. These require a jigsaw, rotary tool, router, or CNC. If the shape is common, using a circular saw or similar methods is fine, but as soon as the shape becomes even slightly more complex, this cutting method is no longer suitable.
For high-precision work or batch quantities, the practical answer is CNC or laser cutting rather than hand cutting. We cover that route in the custom cut acrylic mirror guide.
Under normal circumstances, we generally use laser cutting. As long as the mirror material is not PS and the thickness is not less than 1 mm, the heat from the laser will not cause melting at the edges of the mirror. If the thickness is very thin, using a punching machine will be more efficient, and the edges will also be smoother.
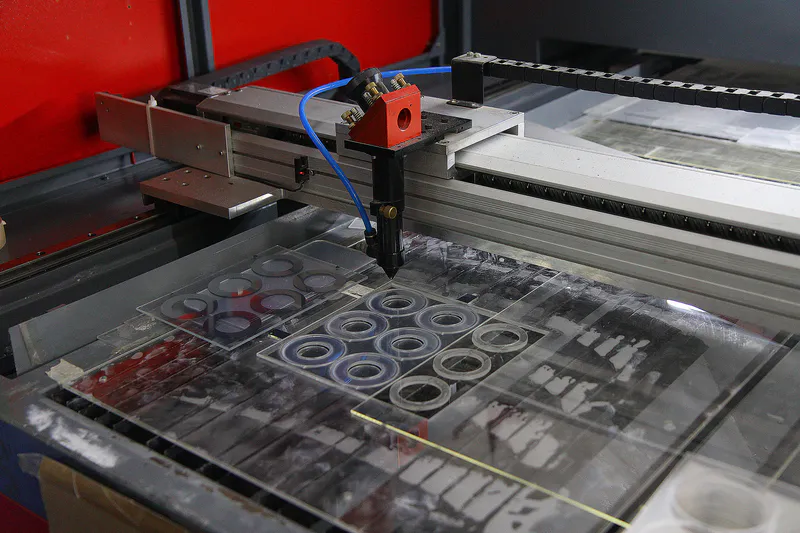
Decide which category your job falls into before choosing a tool, because the technique for each is different.
Score and snap for sheets up to 3mm
Score and snap works well on thin sheets when the score is deep enough and the sheet is properly supported. The most common issue we see with this method is too few scoring passes, which leaves a shallow groove that breaks unevenly.
Clamp the sheet to a flat, stable surface with the cut line aligned just past the edge of the work surface or a straightedge. The sheet must not move during scoring — a sheet that shifts produces a shallow, uneven groove that will not snap cleanly. Clamp it firmly, but do not over-tighten the clamps. Clamping pressure concentrated at one point is itself a stress source and can crack the sheet at the clamp.
After CNC scoring, workers then quickly snap off the small lenses by hand. Factories that pursue efficiency generally won’t use large amounts of manual labor to repeatedly score acrylic along a metal straightedge with a specialized scoring tool, because it’s difficult to ensure that each score line stays perfectly level. This method is only suitable for simple personal use: if the groove is deep and even, you can get a clean break; if the groove is shallow, you cannot.

Sawing sheets above 5mm
For thicker sheets, or for many repeated straight cuts, a saw is faster and more consistent than score and snap. Blade selection matters more than the saw itself. Use a fine-toothed blade designed for plastics. A coarse wood blade has too few teeth and removes too much material per tooth, which tears and chips the acrylic; a fine-toothed plastic blade cuts cleanly.
On a table saw or circular saw, set the blade to project just past the sheet rather than running deep, use a fence or guide for a straight cut, and keep the feed rate moderate and steady. Feed rate is the critical variable. Acrylic melts before it burns, and a blade fed too fast generates friction heat that melts the cut edge; the melted material then re-fuses behind the blade into a rough, gummy edge. A steady, moderate feed keeps the edge temperature down and the cut clean.
A jigsaw handles thicker straight cuts and gentle curves. Use a fine plastic-cutting blade, keep the blade speed low, and start the blade before it contacts the material rather than plunging into the sheet. On a series of cuts, allow the blade to cool between them — a hot blade is the most common cause of melted jigsaw edges. The masking tape over the cut line is worth using here to limit chipping.
One point from production worth applying in any workshop: most cracks that appear at internal corners come from the stress concentration at a sharp 90-degree notch, often combined with handling or assembly stress afterward. Where a cut has an inside corner, drill a small radius hole at the corner point rather than cutting a sharp notch. The radius removes the stress concentration where cracks start.
Cutting curves and shapes
Score and snap cannot produce anything but a straight line. For curves and circles, the practical tools are a jigsaw with a fine plastic blade, a rotary tool with a plastic-cutting disc, or a router with a template.
For small holes such as cable pass-throughs, use a hole saw at low speed. For larger circles, rough-cut with a jigsaw along the marked line, then refine the edge. For repeatable or precise curves, a router with a template gives the cleanest curved edge of the hand-tool methods, because the bearing follows the template rather than relying on a freehand line.
For intricate shapes, fine cutouts, or any shape you need to reproduce in quantity, hand cutting is not worth the material risk. This is the point at which CNC or laser cutting from a drawing is the sensible choice, and we offer that as a service. Note that curved mirror products — convex, concave, and dome — are not made by cutting curves into flat sheet; they are thermoformed, as covered in the curved mirrors guide.
Drilling holes
Holes crack sheets more often than cuts do, for two reasons: heat from drilling too fast, and blowout where the bit exits the back face. Both are avoidable.
Drill with bits suited to plastic, or with standard twist bits used at low speed. Run the drill slowly — high speed generates heat that melts and grabs the material. Back the sheet with a piece of scrap wood so the bit exits into the backing rather than into open air; this prevents the chip-out and cracking that occur when a bit punches through an unsupported back face. This is only suitable for personal processing of mirrors.
In the factory, any drilling we do needs to be specified in advance, because we carry out the drilling directly during the CNC or laser‑cutting stage. If your requirement is added at the last minute, this can only be done during the prototyping phase. If you do this after the order has been confirmed, it will cause waste in many parts of the process.

For screw-mounted installations, drill the holes slightly oversize. Acrylic expands and contracts with temperature considerably more than glass, as covered in the thickness guide. A screw through a tight hole prevents that movement and concentrates stress at the hole, which is a common cause of cracks appearing weeks after installation. An oversize hole gives the sheet room to move.
Finishing the edges
Any cut other than a laser cut leaves an edge that needs finishing. Saw and jigsaw edges carry tool marks and small chips; a snapped edge is cleaner but may have a slight lip. How far to take the finishing depends on whether the edge will be visible in the finished installation.
For edges that will be hidden in a frame, against a wall, or behind a fixture, a single pass with fine sandpaper to remove any sharp burr is sufficient. For visible edges, work up through progressively finer sandpaper — a typical progression runs from around 220 grit to 320 and finer — then finish with a plastic polish or a careful flame-polishing pass for a clear edge. The custom cut guide covers the edge-finishing options, including when flame versus diamond polishing is appropriate.
Keep solvents and harsh cleaners away from freshly cut edges. They can attack both the acrylic and the reflective backing, and a cut edge exposes both. Use mild soap and water for any cleaning around the cut.
Basic precautions
Wear eye protection — acrylic chips and dust are thrown during sawing. Work in a ventilated area, since powered cutting can produce fumes. If you are using a method or tool for the first time, make a test cut on an offcut to set your feed rate and pressure before cutting the actual piece. A test cut calibrates the settings more reliably than working from written figures, because tool condition, blade sharpness, and material grade all affect the result.
When to cut by hand and when to use a factory cut
Simple straight cuts on thin sheets, up to about 3mm, are reasonable to do by hand with score and snap. For straight cuts in thicker stock, a saw with the correct blade and a controlled feed rate gives good results in a workshop.
For thick sheets, large panels, complex or curved shapes, high-precision work, or batch quantities, factory cutting is the better option. CNC and laser cutting hold tighter tolerances, produce consistent edges across multiple pieces, and reduce material waste — hand cutting a valuable sheet and getting it wrong wastes more material than a factory cut costs. Because acrylic mirror has a practical size limit before reflection distortion sets in, most large sheets are cut down to usable sizes before installation in any case, and having that done as a factory cut to size avoids both the waste and the handling risk. Our large mirror sheets are available cut to size for that reason.
One Response